Last updated on April 17th, 2023 at 12:39 am
As you may have noticed, over the last week we have made some dramatic changes to our blog as a whole.
This has included a complete change of theme, even moving to a paid “Pro” version theme and a lot of speed and code optimisation.
The one thing that was really bugging us though was the amount of WordPress plugins we were using. In total, we had 32 active plugins. This is mostly down to pure laziness! It is much simpler to install a plugin and let that do all the work, rather than code it yourself.
But, the time had come to stop being bone idle and given that I’m a coder by trade, time to start coding what the plugins were doing and then uninstalling as many as possible.
Moreover, if checked rarely, some plugins could become out of date or long abandoned by the original creator, which causes WordPress issues like white screen in the future.
Caching and Optimisation Plugin Removals
We were using a number of different plugins for both caching and optimisations. These were:
When we setup this WordPress site, we just blindly added what we thought would make the site quicker and a lot of posts at the time said to use caching and optimisation plugins like the ones above.
However, I recently started to read up about caching and optimisation plugins on the internet. The general consensus around these were that if you were using a decent host and Cloudflare – you did not need them.
We are using Cloudflare for this site and use a large number of their features, including caching and Java, HTML and CSS optimisation. This left me thinking that it’s all just a bit over kill and I could get rid of the three caching plugins, so I did.
I also removed the WP-Optimize plugin as I had read that it’s just not worth having it installed. Instead, you can just install a plugin like this every few weeks or months (depending on your blog site) and run it once and uninstall it again.
I then ensured that the Cloudflare caching was completely cleared and then tested it again 12 hours later. I was hoping it would make a difference, or at least be the same, but the speed reports were coming back that the site was actually loading even quicker.
Not just was the speed loading quicker, it got rid of some of the CSS issues that Autoptimize seems to cause and best of all, I had uninstalled three plugins.
Image Optimisation Plugin Removals
SMUSH
As mentioned above, I also included SMUSH as something that I have uninstalled from this site. The reasons for this were pretty simple. You do not need it!
The only reason anyone needs an image optimisation plugin is that they are uploading massive images and not optimising them before they are uploaded to the site.
You can use all sorts of free programs to optimise your images before you upload them. Here are just a few:
All you really need to do to optimise an image is to resize it before you upload it. Yes there are loads of plugin’s that will do fancy stuff like convert it lossy and all that, but really, just resize it to the largest size for your site and that should be more than enough.
To find the largest size for your WordPress site, go to your portal and go to:
Settings > MediaOnce you have resized the image, save it either as a PNG or a JPG file. My general rule is that I use PNG if the image needs to keep its transparent background or for any normal images, I use JPG/JPEG.
This will bring down the size of your image and vastly lower the file size – meaning your image is optimised before you upload it to your site – so no need for server resource heavy image plugins!
Security Plugin Removals
I have made the decision to keep a few of my WordPress security plugins. I know that we do not need to do that as we can use our host or Cloudflare for a firewall, however, I do not to know that there is that extra level of protection for the site.
However, there is one security plugin that we have got rid of.
Really Simple SSL
You will find a lot of people posting that Really Simple SSL is a must have – I know this because up until a few weeks ago, I agreed.
However, it is not. The only reason you need Really Simple SSL is if your WordPress site is not setup correctly.
When you uninstall Really Simple SSL, it does something a bit sneaky, it reverts all your site settings back to http. Is this is make it look like you really need to have this plugin? Maybe, maybe not, who knows, but even way, you can word around it quickly and easily.
Changing your WordPress to HTTPS
You need to ensure that your site is set to https and not http after you have installed the Really Simple SSL plugin.
To do this, go into your WordPress portal and head to this location:
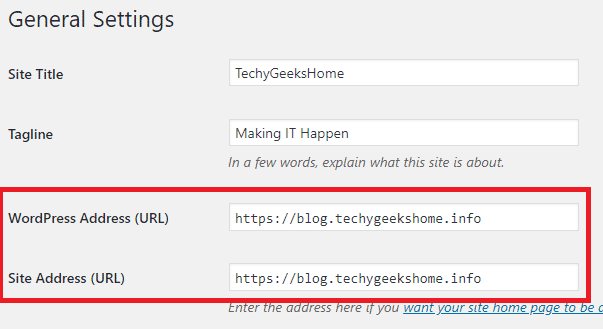
Settings > GeneralThen ensure that the following two settings are set to HTTPS:
- WordPress Address (URL)
- Site Address (URL)
So it should look like this:
Save these settings and your site is then set to use HTTPS instead of HTTP.
Note: You should know this, but obviously this will only work if you have a SSL certificate setup for your site. As you have Really Simple SSL plugin installed, the assumption is that you do. If you don’t, making this change will balls up your blog! you have been warned!
Navigation Plugin Removals
WP-PageNavi
Although we had WP-PageNavi installed, we did not need it. All it really does is to give you a fancier “Older Posts | Newer Posts” page navigation.
As we are about technical guides and not a fancy Instagram blogger, we do not need hearts and bunnies, just some good old text will do.
So, WP-PageNavi also got uninstalled but we have not replaced it with any code.
Moving the Page Navigation Buttons with Code
However, what we have done, is to move where the page navigation buttons attach sit in our posts. This will changes from theme to theme, but by default, our page navigation buttons were underneath our related content section and just above the author box:
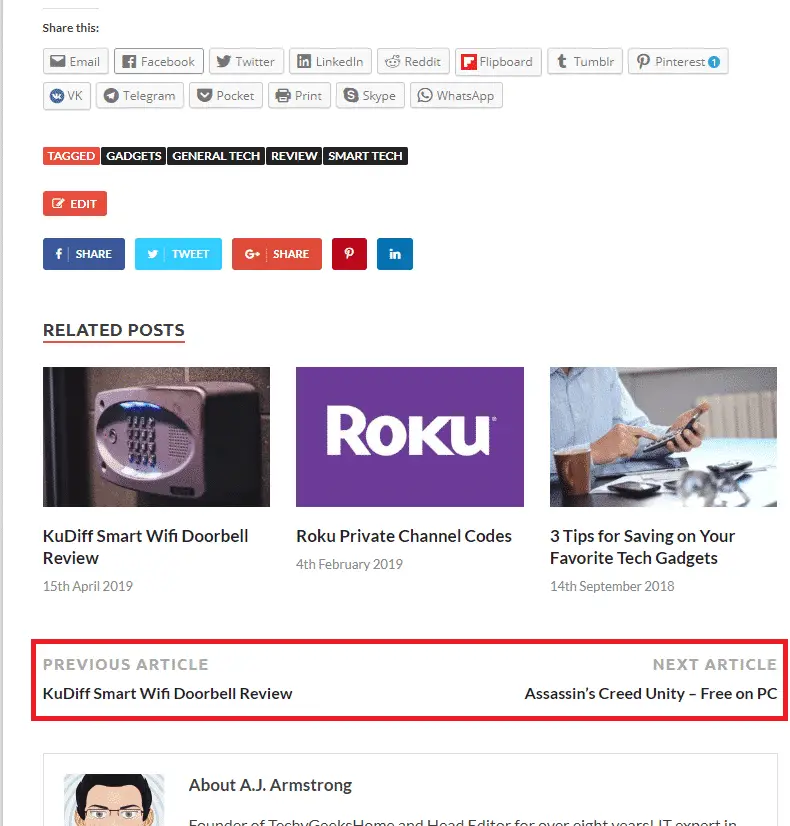
But we wanted it just below the post itself as it is hard for our visitors to see these by the time that they have got to the end of the post.
To do this, you need change a simple bit of code where you want to move the pagination buttons.
This can be tricky depending on the theme that you are using, but you are basically looking at editing for the following files:
- single.php
- page.php
These are the templates for your posts and pages within WordPress. As I said above, these may not be where you directly edit the PHP code, but should point you in the right direction for the file you do need to edit.
If you take a look at the screenshot below, this is our code for a single post:

This should now make sense for the screenshot of our actual blog post. To begin, you can see the related posts section, followed by the posts navigation section, followed by the author box. So this matches what we have on the post.
All that is required now, is to move the post navigation section above the related posts section:

You should then save this file and upload the PHP file to your child theme.
Now refresh your post and you should now see that the page navigation has moved:
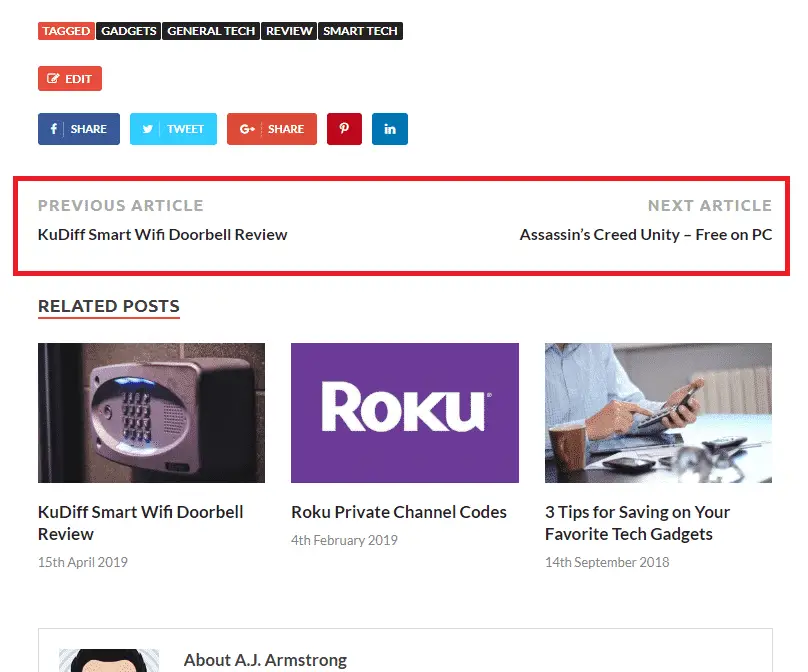
This is just how to move the pagination buttons above the related posts section. You can obviously edit the code to put the pagination where you want it using the same method.
Style Plugin Removals
Forget About Shortcode Buttons
We have used Forget About Shortcode Buttons plugin for a number of years. It does make buttons look great but as we are culling as many plugins as possible, this plugin is a fancy style one with no real technical need to be installed on our site.
One of the other concerns with this plugin is that it had not (to date) been updated in 7 months and was not tested on the version of WordPress core we were using. So it has to go as well.
We uninstalled this plugin, but the downside of doing that is the CSS code that it leaves behind.
As you can see from a screenshot from our site below, it leaves it looking a real mess:
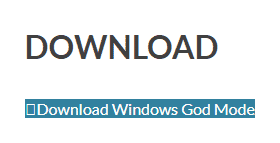
This means that you have to tidy up the code. If you have a small amount of these buttons, it is pretty simple. If you change the WordPress editor into HTML mode, you will see some HTML code similar to this:
<a class="fasc-button fasc-size-medium fasc-type-flat fasc-rounded-medium fasc-ico-before dashicons-admin-site" style="background-color: #33809e; color: #ffffff;" href="https://techygeekshome.info/wpdm-package/god-mode/">Download Windows God Mode</a>As you can see from the code, the plugin has left behind its CSS. This is a bit poor really, the uninstall should also remove it, but it does not so, you can go ahead and delete this part of the code with is the class CSS code:
class="fasc-button fasc-size-medium fasc-type-flat fasc-rounded-medium fasc-ico-before dashicons-admin-site" style="background-color: #33809e; color: #ffffff;"This should then leave you with a much tidier section of code that looks something like this:
<a href="https://techygeekshome.info/wpdm-package/god-mode/">Download Windows God Mode</a>Save the edits that you have made to the post and refresh the post so that you can see if the changes have worked.
As you can see, the messy button has now turned into a basic hyperlink:

If you have a lot of these buttons that you want to remove (like we had), you can temporarily install a plugin to do it for you.
I would recommend Better Search Replace, that is what we used and it has seemed to have dome the trick.
Classic Editor
I know that this is probably going to be a controversial one, but, like most WordPressers out there, I hated Gutenberg when it was forced upon us. Mostly because I do not like change and do not like being told what to use on my own site!
Because of this, I immediately dismissed Gutenberg and installed the Classic Editor plugin, which from the 1 million+ installs it has, it seems everyone else did the same too!
However, as I am trying to get rid of as plugins as possible, Classic Editor had to go.
That mean’s that I have started using Gutenberg and I have to be completely honest, I really like it. It has taken a short while to figure out where everything is again, but once you do, it is a really good editor and I’m happy to use it over the Classic Editor.
SEO Plugin Removals
Broken Link Checker
This is another plugin that we have had installed for a while, again thinking it to be critical to our Search Engine Optimisation (SEO).
However, when actually thinking about it, we use Google Analytics, so why on earth do we need this plugin? the answer was:
because it tells you when there is a broken link right on your WordPress Dashboard and that is dead simple!
This may be dead simple, but that is not a good enough reason to keep it installed. So that’s another one off the list.
Inline Related Posts
This is another plugin that we had been using for quite a while and was advised some time ago that this would bring us massive amounts of traffic and cut bounce rates – it didn’t.
I’m sure that Inline Related Posts is a great plugin and for other blog sites, it probably will cut bounce rates, but I think that with our site, as it’s mainly technical guides about how to fix things, you will only really want to read one article and then disappear. This plugin simply did not work for our site, so that’s another one in the bin.
Newsletter
This Newsletter plugin got me into big trouble with my host. But before I give the reasons for that, let me state that this plugin is an awesome plugin and platform if you want to get subscribers and email them for a smaller site or even a WordPress hosted site.
My problem with this plugin started when I imported my newsletter list. It consisted of well over 10,000 email addresses. But I didn’t think this was much of a problem so I continued to setup my templates, newsletters and subscription forms.
After a few emails had gone out to my 10k+ email addresses, my host banned my site without warning!
It turned out that the plugin was using the hosting PHP email system to send the emails and it had brought the shared server I was on to a standstill.
My host demanded that I either pay for a dedicated server or remove the plugin. So I removed the plugin.
It did mean that I have ended up with a spreadsheet with loads of emails on that I can do nothing with. I have since setup subscriptions to my blog using the JetPack module but it is starting from scratch again as you have to pay for the premium version of JetPack to allow you to import email address. I’m not spending money on JetPack Premium!
If you have signed up for our newsletters or notifications about new posts in the past and have not been receiving anything, this is probably why. If you scroll to the end of this post, you will see where you can sign up for notifications of new posts on this blog there.
Mobile Plugin Removals
AMP (Accelerated Mobile Pages)
AMP has been all the rage over the last year and we have tested on our site here and we have had nothing but problems with it.
AMP can be infuriating to setup and to ensure that everything you want available is also difficult. The stories of Google penalising sites that do not have AMP did push us to install it but having looked at our stats for with AMP and without AMP, there really has not been any difference apart from more work to keep it working correctly. Googles own Search Engine portal kept complaining about all sorts of errors, so in the end, I’d had enough and it has been uninstalled for a few months now – again without any noticeable difference in our Google search traffic.
You do want to be able to provide your mobile users with a better experience though, so you have a few other options.
- Responsive Theme – ensure that you have a theme that is responsive web design to mobile devices
- JetPack Mobile Theme – JetPack has a mobile theme built in that you can use which is not too bad
- PWA – Progressive Web Apps – this is fairly new technology, I don’t know a huge amount about it yet, but here is a link to the Google page for it.
Reporting Removals
Statistic reporting plugins is WordPress are notoriously resource heavy. This is mostly due to the fact that they are monitoring every hit that you get and where that hit is going.
WP-Statistics
We had been using WP-Statistics for our reporting even though we were also using Google Analytics. This was mostly down to the fact that you get a pretty little graph on your WordPress dashboard.
The plugin did not really offer us anything that we were not getting from Google Analytics, so this is another plugin that we have now uninstalled.
Discover more from TechyGeeksHome
Subscribe to get the latest posts to your email.





![Google Blogger site not loading correctly [2022 Updated] 13 Google Blogger Featured Image](https://techygeekshome.info/wp-content/uploads/2014/04/Google-Blogger-Featured-Image.jpg)
